17 Proven Tips to Speed Up Making 3D Renderings
- Ievgen Zakharov
- Jul 6, 2018
- 13 min read
Updated: Sep 24, 2020

You respect deadlines. Whether you are a 3D artist, a team leader, or a client who use 3D visualizations for your needs. You concern whether or not 3D renderings will be done in time. Let me tell you, your concerns are very reasonable, because missing deadlines may cause negative feedbacks or other reputational losses.

Use these 17 tips (proven on hundreds of various projects) to get 3D renderings faster.
1. Use stock 3D models and textures.
This is a tip for 3D artists and team leaders. But clients can participate in this process and use this suggestion too.
3D artists don't need to make all of 3D models and textures from scratch.
Here are some samples of stock 3D models which already created by various 3D artists around the World:
Bathroom accessories and fixtures.
Interior and exterior plants, trees, flowers.
Interior and exterior furniture.
Light fixtures.
Cars.
You can just download or buy them. There are many web platforms with stock 3D models. Here are some of the popular:
Of course, if you need to create some specific furniture, accessories or something else, and you cannot find a 3D model of this objects on a 3D stock platform, it's not the case. In this case, a 3D model of this object should be created individually. However, in many cases, a downloading or purchasing of 3D models on a stock platform will give you time and even cost economy.
For example:
1. You work on interior 3D renderings of a living room. Probably it's possible to download or purchase 3D models of a TV and interior accessories on stock platforms rather than spend hours with 3d modeling of these objects.

2. You work with exterior 3D rendering. Perhaps, you shouldn't care about creating 3D models of trees and exterior plants with every single leaf and branch. You also shouldn't care about creating 3D models of cars, exterior furniture, and in many cases about 3D models of surrounded buildings. You can find all of these 3D models on stock platforms.

BTW: you can use the Good Free 3D Model of Buildings in your architectural or other kind of scenes. This model is done by 3D artist AndreyAE.
You also can buy or download free textures for your projects on the following platforms:
3D artists need seamless textures so that they didn't have a seam effect if tiled. To make them they use various image editing software and spend their time and effort. Good news, many of the texture stock platforms mentioned above have seamless textures of various materials. So you can download and use them without additional edition.
If you are a client who uses 3D rendering services, please keep in mind that you can review 3D models and textures on stock platforms and ask or suggest your 3D artists use them in 3D renderings they make for you.
2. Keep and use old project files.
This is a tip for 3D artists, and team leaders. If you are a client and got working files from your 3D artists, you can use this tip too.

Never delete your project files even if you did them 10 years ago.
You can use objects, materials and render presets taken from these files in your next projects. So it may speed up your further work.
If you think about how to get free space on your HDD, you can use either method provided below:
Archive your old work files by using archive apps, such as WinRAR, etc.
Move your old projects to an external or cloud storage.
3. Use the symmetry.
This tip is for 3D artists.
A lot of things in the real world, such as buildings, furniture, electronics has a symmetry. It means that to make 3D models of these objects 3D artists can model a half, a quarter, and even in some cases 1/8 part of an object. After that, they can get the rest of it as a symmetrical part.
Look at this 3D rendering of the complex historical building.

Though it isn't quite symmetric the most part of the building has a symmetry axis.
Our team did not model the whole building. We did a half of it, and after we used the mirror 3DS Max function to get the rest. After that, we added parts which aren't symmetrical. Imagine how many time we saved.
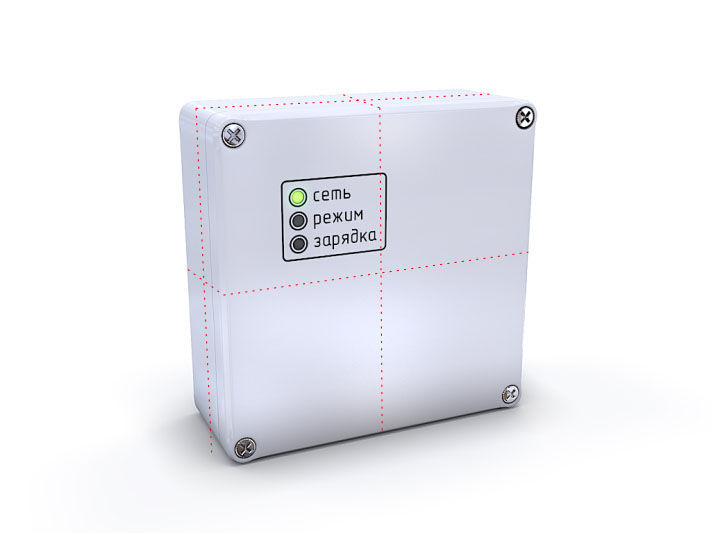
Look at this 3D rendering of the electronic device.

Though due to LEDs, inscriptions and the junction line it is not quite symmetrical, without these details it has the several symmetry axes.

It actually allowed me to make only 1/8 part of this box, after that I used the symmetry modifier in 3DS Max to get the whole box. And then I added LEDs and inscriptions.
4. Use plugins and scripts.
This suggestion will be interesting for 3D artists and team leaders, because usually, they control scripts used in making of 3D renderings.
Plugins and scripts allow us to:
Speed up some of the operations.
Add an additional functionality.
Make some of the processes more convenient.
3D Studio Max, Maya and many other 3D modeling and rendering applications have the ability to install plugins and scripts. Here are some of the scripts for 3DS Max:
1. Bevel lite. Allow us to easy create objects with bevels, especially wooden parts, such as a tabletop.
2. Copy/paste. Though 3DS Max doesn't have important functions such as copy and paste, you can install this script and use them. Use this script to copy a selected object from your scene and paste it into another scene. The script uses a max file in a system folder to keep copied objects. So, you can use this script in 2 ways:
Select and copy an object, open another scene, paste an object.
Run 2 instances of 3DS Max (by running the application twice) and open scenes in each 3DS Max. Select and copy an object in a scene of one of 3DS Max, and paste it into a scene of another instance of 3DS Max.
3. Instancer. Creates instances from selected objects.
4. Fast Housing. Allow us to quickly create house by using parametric 3D modeling tool.
5. Use 2D or 3D Cad files.
This is a tip for 3D artists, team leaders, and clients.
If a 3D artist or a team will use CAD files, provided by clients, it will speed-up make 3D renderings.
Objects from 3D Cad files, such as Solid Works, ArchiCAD, Revit or 3D AutoCAD files can be imported in 3D rendering applications. So it is possible to use them and not create from scratch.
Splines from 2D files, such as 2d AutoCAD drawings or Adobe Illustrator drawings can be imported in 3D rendering applications. In these cases, it is possible to not create splines used for 3D modelling from scratch.
So to speed up making 3D renderings:
If you are a client who uses 3D rendering services, provide CAD files to 3D artists if it's possible.
If you are a 3D artist or 3D artist team leader, ask your clients to provide CAD files, if it's possible.
6. Set the low priority for 3D applications before starting rendering your scene.
This is a suggestion for 3D artists.
A rendering of 3D scenes uses a lot of CPU power, 100 percent in the most cases. Often it can prevent you from doing other tasks, such as working with other 3D scenes on your workstation.
To fix this issue you can set the low priority for the application which renders your scene. In other words, while you will do other tasks on your PC or laptop, your scene will be rendered simultaneously in the background mode.
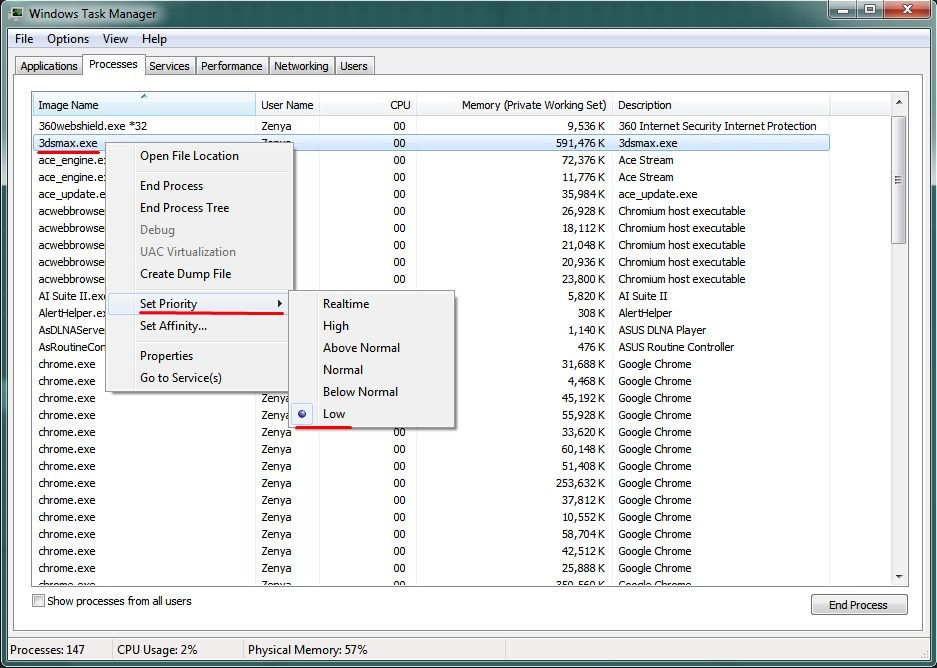
You can assign the low priority in the Windows task manager. Find the process of your 3D application in processes tab. For example, 3dsmax.exe for 3DS Max. Do the mouse right button click and assign the low priority for this process. Actually, it works for 3DS Max with V-Ray.

Please keep in mind that some applications might work not properly in such mode. Read a documentation for your 3D rendering program, and perhaps do tests to make sure it will work correctly.
Please also note, this mode is useful only during scene rendering. If you use a 3D application for making or editing your project, the priority of it should be Normal.
Never set the Above Normal, High or Realtime priority since it can slow down or even stop all other processes, including processes related to Windows.
Also, V-Ray has the Low Thread Priority option, you can switch it on before starting rendering.

If you use another 3D rendering plugin or application, read a documentation to learn whether it is possible to turn on the low priority mode.
7. Use a night time, weekends and holidays to render your scene.
This is a tip for 3D artists and team leaders.
Since a rendering of 3D scenes might take many hours, you can use a night time, weekends and holidays to render your project.
Let a render process go while you sleep, or spend your time with your family or friends.
You can use remote desktop control applications, such as Team Viewer, Radmin, etc. to control a 3D rendering of your scene.
Using this tip will add you a lot of extra time, so you can finish your projects faster.
8. Hide objects you don't work with this moment.
This is a suggestion for 3D artists.
If your scene has many objects and you work only on one or few of them, hide the rest.
Your GPU will work with less data, so will work faster. You will easily rotate and do other operations with objects in a viewport.
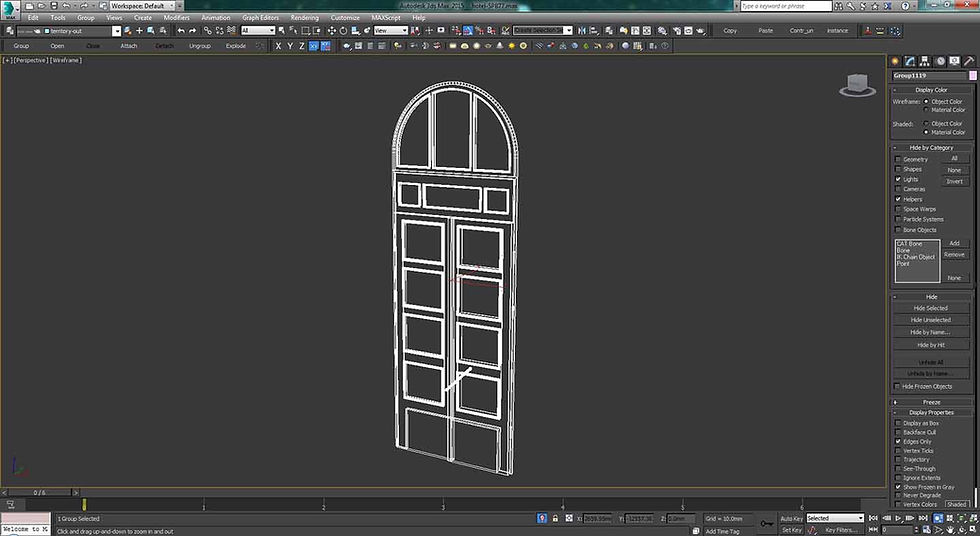
If you use 3DS Max, select objects you want to work with, and click on the Hide Undetected button, or isolate selected.


You may also quickly hide objects by their category by using hide by category tool, which located on the Display panel of 3DS Max (see the details in 3DS Max Help).
If you use other 3D rendering application, check out whether it has such function.
9. Use simplified object displaying.
This is another suggestion for 3D artists which allows increasing display performance.
Simplifying of object displaying allows 3D applications use less GPU and CPU power.
So if you use this mode for objects you don't want to see in full complexity, you will have fewer delays during objects rotations or other manipulations in viewports.
3DS Max artists can switch on the display as box option for selected objects so that they displayed as boxes, which is the very simplified display mode.

If you use another 3D rendering application, check out whether it has "display as box" or other display simplified mode for scene objects.
10. Organize objects by using group and layers.
This tip is for 3D artists.
If you ever did complicated projects you know it's not easy to work with a big amount of objects. 3D rendering applications have tools which allow us to organize them.
Using groups is obvious for most of the 3D artists, but let me provide this suggestion for beginners. It's much easier to move, rotate, scale and make other manipulations with an entire chair, door or chandelier in 3D interior scenes, or with an entire car, bush or tree in exterior scenes, than with details these objects consists of.

Using layers to organize objects in 3DS Max and other 3D render programs allow us to quickly achieve tips no. 6 and 7 for a big amount of objects. In particular, if objects from various categories (such as trees, cars in exterior scenes, or furniture, light fixtures in interior scenes) are placed in different layers in 3DS Max scene, you can quickly hide, unhide, turn on or off the "Display as box" mode for all of the objects in a chosen layer.
The last versions of 3DS Max have the scene explorer, which allows not only provide all of the mentioned manipulations with objects and layers but even:
Include one layer into another.
View a list of objects and how they are included to layers.
Filter list of objects by categories.
Let me tell you, I really like working with layers, since it allows me to speed up making a lot of the complicated scenes, and make the working process very convenient.
Let me show the sample:


11. Use a powerful workstation.
This is a tip for 3D artists and team leaders.
If you hire 3d artists or team, make sure they have enough powerful work computers, if's possible.
If you are a 3d artist, make sure your working computer is powerful enough:
1. Make sure your work PC has enough powerful CPU and a graphics card (GPU).
2. Make sure your computer has enough RAM, otherwise it will use a virtual memory on your hard disk drive, which works many times slower, than RAM. It can slow down an entire process of making 3D renderings.
3. Make sure your working computer has a good cooling system so that it works stable. Check out a CPU and motherboard temperature regularly.
4. You can use overclocking techniques to make your existing workstation or laptop faster. But be very careful with them to not damage your hardware.
If you see your PC or laptop is not powerful enough, especially if you have delays in your working process, upgrade it. You can do it once hardware manufacturers released new devices.
BTW: when I announced this article in our Facebook community CG to Solve Problems one of the members asked me, whether or not it is possible to get 3D renderings fast with the low power hardware. It is possible by using other tips provided here. But keep in mind that having enough of computer performance is very important for getting 3D visualizations quickly.
If you currently haven't the ability to invest in a new powerful workstation or upgrade:
Consider buying used components, such as CPU, RAM, graphics card, etc, for upgrading your workstation, since they are significantly cheaper.
For the same reason, consider buying a used workstation.
Use in the next two tips (see below).
12. Use a render farm or several PC for performing 3D rendering images or animations.
This is a tip for 3D artists and team leaders.
In many cases, this way allow us to get 3D rendering faster, than getting 3d renderings by using a single PC. But it eventually depends on how powerful is a single PC, other computers, and a render farm (or a part of it you use) .
As I mentioned in the previous tip, some 3D artists may have not an ability to upgrade their workstation, or just not satisfied with a computer performance at the given moment. As a solution, they also can use render farms. Or try using someone else's workstations for 3D rendering tasks, if it's possible:
1. If you work in a company, consider asking your boss for use workstations in your office, if it's possible. Probably, some of them are right next to you. Usually, office workstations use local area networks (LAN) to connect to each other, so you can even use for a distributed render, such as V-Ray distributed render, etc.
2. If you work as a freelancer you may ask colleagues, friends or someone else to provide their workstations for 3D rendering tasks. Some people may agree to do it for free, some of them may agree if you will pay them.
Keep in mind you can use tips no. 6 and 7 in order to not prevent or distract people who own or use these workstations from their work.
13. Optimize memory usage.
This is a tip for 3D artists. Especially for those who have a slow workstation or work with very complicated scenes.
Big and complex scenes can use a big amount of a RAM and sometimes a virtual memory. It may cause delays when you work with or render your scene.
You can use the following methods to reduce a file size of your 3D scene and memory usage:
1. If you use 3DS Max you can use instance instead of copy, if you don't need to change copied objects independently from original objects. If you want to turn copied objects to instances, use the instancer script (which is already mentioned in the tip no. 4. )
2. Don't use very large textures, because they will use a big amount of a memory. If you have very large textures, reduce their size by using raster graphics editor.
3. If you use V-Ray for 3DS Max, Maya, Sketchup or Rhino use the V-Ray proxy. It creates external files, reduces a scene file size and memory usage. See the V-Ray documentation for 3DS Max, Maya, Sketchup or Rhino depending on your 3D application.
14. Skip non-important details.
This is a tip for 3D artists, team leaders, and clients.
If you are a 3D artist or a team leader and see that some objects are small, or they are located so far from a viewpoint. You can skip their small details during a 3d modeling so that to economy your time.
If you are a client and you don't need some objects to be represented in a full complexity, just tell about it your 3D artists so that they will spend less time to make 3D models of these objects.
15. Use a team, especially for complex projects.
This is a tip for 3D artists, team leaders, and clients.
Making 3d renderings is a comprehensive and complex process. So it's possible to divide a task and give it to several professionals. They will do different parts of your task simultaneously.
Please keep in mind, team's speed depends not only on the number of team members but on how fast each of members can work. In some cases, a team of 3 members can work faster than a team of 10 members. Especially a work speed of a team depends on the fact how team members follow suggestions provided in this article.
16. Job descriptions and other instructions should be clear and specific.
This is a tip for 3D artists, team leaders, and clients.

If 3D artists will have a clear job description, such as clear instructions, drawings or sketches, from their clients or team leaders, they will spend much less time for a guessing what clients want and for asking additional questions. Sometimes when a job description isn't clear, 3d artists might get nervous. It may cause work delays.
So:
Be specific and give clear job descriptions to 3D artists, if you hire them.
If you are a 3D artist or a team leader, and got something unclear from your client or employer, just keep in mind that the best way to solve this problem is to ask specific questions about unclear parts of a given job.
17. Keep good relationships.

This is a tip for all of the readers.
At the first glance, this seems to have no relation to solving any technical problems and speed up making 3D renderings.
However, a putting psychological tension on 3D artists may cause stresses, so delays in a making 3D visualizations. And even it may cause fails.
The good idea 3D artists should be polite to their clients and employers too. So both parties should keep discussions in the good and polite manner to get fast and proper 3D renderings.
Bonus: avoid this way to speed up 3D rendering.
For all readers.
In the tip No. 7, I suggested using the nighttime, weekends and holidays to render your 3D scenes. Keep in mind, this tip is applicable only for your workstation work, not for your personal work. Of course, you should have a rest. And I don't recommend to use these days to speed up making 3D renderings. Especially using this way consistently.
It may cause issues, such as:
Serious Health issues.
More mistakes.
Slowing down all further work may due to the high tiredness.
Take care!
Do you know other ways to speed up making 3D renderings?
Maybe you know about some script for 3DS Max or other applications.
Or you know about some workflow method which allows to speed up making 3D renderings.
Or you want to suggest something else.
Feel free to share your knowledge in comments below.
Hope this article was valuable and interesting
If you found these tips interesting, share them with your colleagues, friends, and subscribers by using social and link buttons below.
This article is a part of the Client's guide to 3D Graphics
Check out the introduction.
Stay tuned! Subscribe and join our community.
Have a nice day!
About the Author

Yevhen (Ievgen) Zakharov is a 3D Visualizer Artist from Ukraine, who did more than a thousand 3D Renderings including Architectural, Interior, Furniture, and Product visualizations since the year 2001. Feel free to learn more about him and his team.
Feel free to check out 3D Rendering Services that helped many clients to get approval for their exterior, interior, and product designs, sell the products and property.


Helpful tips for faster 3D renderings! If you're looking for expert rendering services, visit us at houseofbluebeans.com
Great insights on software settings! Tweaking render settings and utilizing the right software can significantly impact rendering speed. It's amazing how many artists overlook this aspect, leading to unnecessarily long wait times.